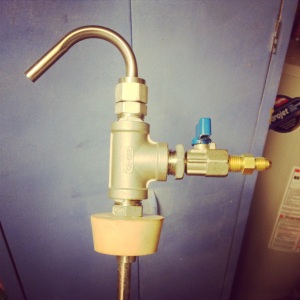
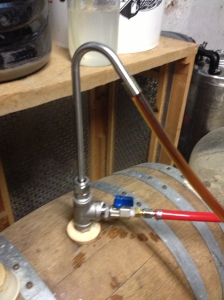
There’s been interest from a few people in the design of my pressure racking cane, so I decided to post it so hopefully it can be of use to others. Like many of my DIY projects this one started with simple necessity. I had a couple situations where either racking under pressure for sanitation reasons, or pushing beer without reliance on gravity were necessary. I looked at the commercial devices, and all of them either looked crappy or were super expensive. I’m also not moving a lot at this stage, so it didn’t need to be capable of moving hundreds of gallons.
The design is really simple. I decided to use a ready-made stainless steel racking cane as the base since it’s already bent nicely, and comes with one of those little feet that helps reduce sediment. The rest of the parts are standard stainless pipe stuff. Here’s a materials list:
- 1/2″ NPT Tee
- Bushing – 1/2″ NPT x 1/4″
- 1/4 Gas valve with check
- 1/2″ NPT x 1/2″ Tube Compression adapter SS
- 5/8″ HOSE barb x 1/2″ NPT
- Drilled Solid Stopper (Size is up to you)
- 3/8″ ID hose
Most of this came from Bargain Fittings, which I’ve always been happy with. Assembly is pretty straightforward. The pictures should show you the arrangement of parts pretty clearly, there are just a couple tricky bits. 1) That 5/8″ barb CAN be pushed through a standard 3/8″ drilled stopper, just use a bit of StarSAN for lube and it should pop right in. This makes a nice tight seal, and should hold up to pressure just fine. 2) When I originally ordered parts for this, I ordered a 3/8″ compression fitting to fit my 3/8″ SS racking cane. Well 3/8″ ain’t always 3/8″ apparently, and the ring and nut for the compression fitting wouldn’t fit over the cane. So, what I did was to swap it out for a 1/2″ compression fitting. Then I cut about a 1/2″ inch of 3/8″ ID x 1/2″ OD hose and slid it unto the cane, I slipped the 1/2″ compression ring over that and it all came together just fine. Don’t skimp on taping your threads, we want everything as tight as possible. The nice thing about this setup is that you can loosen the compression fitting in order to slide the cane in and out for different depths.
That’s basically it. Connect it to your CO2 tank, and tubing of choice, and push some beer!
A couple of notes about use. You need very little pressure to push beer out and too much can make a huge mess. I’d recommend hooking everything up, starting at zero, opening the valve and and slowly increasing the gas until you have the flow you need. I’ve found that the stopper will stay pretty well put unless you send too much pressure through. If you really want to push fast, you can hold the stopper in. Do be aware though that too much pressure can blow up your carboy or whatever. Also note, this basic setup can be scaled up to support a higher flow rate.
Happy building!


Thanks for this write-up! Great timing. On Sunday I just brewed 11 gallons of Flanders Red. In a month I’ll rack it, with another 6-week-old batch of the same beer, into a 15.5 gal. sanke keg to start my solera.
I’ve been thinking about how to get the beer out of the keg recently. I’m nervous about using a drilled stopper and airlock to seal a keg for many years (I don’t want 15 gal. of vinegar), and I was leaning towards using a tri-clover to ensure the seal on the keg was good. I’ll have to give the whole configuration more thought. The pre-fab solutions I’ve seen so far are quite expensive. I want something reliable, but cheaper. Mating your idea with a tri-clover to seal the keg feels like a good solution. I’ll give it some more thought.
I also owe you a description of my extract vs. single-infusion lambic-style beers (which have now become part of a separate four carboy solera). Hopefully I’ll get them tasted and blended by the end of summer
Tony, that sounds like a fun project. Personally, I don’t worry about seals/stoppers, etc too much. My main concern is keeping flies out as they will be very attracted to any sour beer. My typical strategy is to use a stopper and blow-off tube until primary has finished and then switch to a burping wine stopper. I definitely would not use anything that used fluid as the “lock” as casks breathe and can suck quarts of solution into your barrel if left alone. I also only top up at the end of each cycle, (every 6 months) and have never had to worry about acetic. Best of luck with your brews!
I see what you mean about the stopper. I think it helps to look at the solera in stages. So stage one, when most of your fermentation is happening, you’ll likely need a blowoff tube. Stage two will be continued active fermentation for weeks to months (depending on the weather), and for this an airlock is fine. (Mine is in airlock mode as we speak) Stage three, fermentation has slowed beyond the point where an airlock is necessary, for this I use one of those burping stoppers they make for wine. Keeps the pressure within reason and there’s no contamination risk. This can stay on until you wish to rack in/out.
Alternatively, I’ve use just a solid bung, or a drilled bung with a spile in it. If you’re worried about it blasting out while you’re gone and god know’s what getting in there, you can drape a folded towel over it. I’ve done this while on vacation. If the bung blows out, hopefully the towel will keep it in place, and reduce risk of stuff crawling in.
Casks do breathe so you want to allow that without allowing fruitflies and what have you. Don’t worry too much about vinegar, as long as you are reasonably sanitary, and don’t leave the cask half full of air for months you should be fine.
I ordered parts for something very similar to your setup a few days ago. I bought a few extra pieces, so I can attach it to a carboy (using a drilled stopper) or a tri-clover setup (for the keg).
Thanks for the hint on the wine stopper. I’ve never used one of those before. I typically use the s-shaped airlocks on my sour beers for long term aging. That way they just run backwards and suck a small amount of air in instead of sanitizer. I haven’t had any trouble with too much acetic acid, though the longest I’ve had the beer in a carboy is only about 20 months.
Cool, I’d love to see the tri-clover setup when it’s done.
Funny, I’ve had those S-locks suck back so many times. It’s not much sanitizer, but mine often get fruit flies in them so that’s a concern. The wine locks are great because you can forget about them.
So, I am not the most technical or mechanically inclined, so bare with me for a moment while I try to visualize this.
Your parts are as follows:
1/2″ NPT Tee
Bushing – 1/2″ NPT x 1/4″
1/4 Gas valve with check
1/2″ NPT x 1/2″ Tube Compression adapter SS
5/8″ HOSE barb x 1/2″ NPT
Drilled Solid Stopper
3/8″ ID hose
Now, the let’s sit the NPT Tee up as if it were an actual T.
On the left side of the T, facing the beer, you have the 5/8″ HOSE barb x 1/2″ NPT screwed into the T, correct? Then the Drilled Solid Stopper is forced over the barb?
On the right side of the T, facing upwards, you have the 1/2″ NPT x 1/2″ Tube Compression adapter which you slide the whole racking cane through in an effort to tighten/raise up/etc.
On the bottom of the T, the gas-in side, you have the bushing and then the gas valve, correct?
I just wanted to make sure I understood before I went out and bought parts.
How fast, give or take, without holding in the stopper, will this move the beer?
Thanks in advance,
Joe
That sounds correct yes. Don’t forget you need to adapt the 1/2 compression fitting to the 3/8 racking cane using about 1/2″ of 3/8″ID tubing. Otherwise you won’t get a tight seal. Best of luck with your build!
For the tubing you used to make the 3/8″ racking cane fit the 1/2″ compression fitting, was it vinyle or silicon?
Vinyl!
Thanks these instructions worked a treat & saved me a fortune
Glad to hear!
I have seen your post many times and finally got around to getting the last pieces. However, I thought it was as straight forward as it appeared and failed to read it and found that step 2 was pretty critical and have to laugh about my blunder. I’m sitting here looking at the 3/8″ x 1/2″ NPT part thinking “SWEET!” and then noticed that it will never work. OOPS! Luckily have have the 1/2″ compression parts necessary but too bad that now I have the 3/8″ parts without a current purpose. Thanks for sharing! I hope you get a laugh at my expense.
Haha, it took me a few tries, I’m really not very good with these kinds of parts myself.
Hi there, where did you buy the “1/4 Gas valve with check”?
John, I can’t recall now, maybe mcmaster-carr.